
Habitat for Humanity of Highlands County (HFH) build in Lake Placid, Fl., October 2-16
 by Joe Gavin
This is an accurate account of my very first HFH home building project. I decided earlier in 2016 that I was going to become a member of the HFH Care-A-Vanners (CAVs) program. I decided that my very first build was going to be with Habitat for Humanity Sebring, Highlands County, Fl. I have really wanted to do a build with the CAV’s for a long time, but I needed to retire first. So, in January 2016, I made sure my cash flow model was going to work perfectly for us (and it does)! I also planned us a 7-day retirement vacation at Walt Disney World/Fort Wilderness, Orlando. Generally, when CAV’s sign-on, they do so for 2 weeks at a time for a build. So, I looked at the scheduled builds and signed on for the 2-16 October build. When I arrived at the HFH office in Sebring, Florida I quickly found out that the primary machine (called a “Lull”) that was being used to lift the heavy roof panels up was broken and had been broken for several days. So, I was asked if I could work in the HFH ReStore (the retail arm of Habitat) for a couple days while the machine was getting repaired/replaced.
When I walked into the store I was introduced to the local HFH build manager to the store manager, Chris. He immediately asked what my skills were, trying to find a slot for me. I just smiled and said woodworking, cabinet building, and furniture repair. “Great”, he said loudly, that’s exactly what we need right now! He showed me to back room full of things that needed to be repaired. So, I repaired all kinds of things for him. Once I finished the repairs (some simple, some not so simple), they were checked over and the pieces were taken directly out to the showroom floor and they were sold within 2 hours.
On Tuesday, I spoke with Frank, the on-site build lead and he said I needed to make a “Plan B” just-in-case we needed to seek a place out of hurricane Matthew’s storm path. There were a flurry of emails and instant messages from the local and national HFH managers who look out for CAV’s, making sure that we were going to be safe and out of harm’s way. I called Pen from the ReStore and we talked it over on whether we should make plans to stay or go. I quickly checked with our insurance agent to make sure the RV would be covered if the storm dropped on the RV, and he assured me that it was covered. Pen and I made the decision that we were going to have to button up the RV, load our “emergency go-bag” and head for a safer location! Pen had found and booked for us a room for Thursday and Friday night in Sarasota that accepted dogs as well.
When Thursday came, we closed the trailer and relocated to Sarasota. This was a very good move! Pen’s quick action on Tuesday got us a place. When we arrived at the hotel, there were no rooms available anywhere from Ft Meyers to the north of Tampa. We were just 2 of the expected 1,500,000 people that were having to be evacuated.
We spent Thursday and Friday 2 days at the Baymont Inn, Sarasota, walking the dogs and watching the Weather Channel hours on-end report minute-by-minute what was happening with hurricane Matthew. Every hour there were 25 different storm track models were being displayed and many showing lines going through Sebring. We were truly lucky to be in a hotel room. Pen, Captain Jack, Mister Gibbs and I were safe, albeit bored in our hotel room. Looking at the major streets and massive traffic jams in Sarasota, I suspect that many were not in any rooms at all and they were sleeping in their cars.
The hurricane passed and we came back on Saturday morning. We didn’t note a lot of property or tree damage on our way back to the RV. The RV was in great shape with no apparent damage.
Monday, I reported to the build site with my helmet on and my tool belt loaded.
Up until then, I never had poverty stare unblinkingly in my face.
Never. Real poverty.
When I arrived at the build site (which was on a corner lot), there was an immediate, deep and sad feeling that wasn’t easy to shake off.
It shook me to the core in ways I wasn’t prepared for. People walking on the street without any shoes with very few cars.
Looking directly across the street, there was a lady sitting in her yard under a tree. It was a solid 90°+ with a high humidity index without any benefit of a cloud anywhere. I asked a team member why she would be doing that. He replied simply, “because it’s cooler than inside her house”. Using the term “house” is being liberal, more of a really run down house. She wore a simple dress, no shoes, no hope, nothing but abject poverty existence. She asked the team lead if the HFH ReStore might have a used fan she could have. Frank, the team lead took note and on his next trip back to ReStore, brought her back two of them, and she was delighted. He also brought a lawnmower to trim down her grass and weeds. She had tears of joy on her face. Every direction I looked, the neighborhood looked the same.
Poverty now has a permanent picture in my conscience
On the opposite corner, another woman sat out every day staring at us. I asked about her as well, the team lead said that she was going to be the new owner of this house. She grew up in this neighborhood and everyone knew her. Even the kids getting off the school bus all said “Hi” to her. She used to have a house in the neighborhood, but she had a fire and literally lost everything she had. She lost everything except the clothes on her back. Luckily, the Fire Department got there in time to save the foundation, but she had no insurance. None. When her sad story got out, the local HFH worked with her to get through the paperwork blizzard and she managed to get qualified for a loan to cover her home. Not a simple thing to do, but it was doable for her. So, for the time being, she is living in a 1 room efficiency, watching us diligently build her future home.
That, in and of itself, was very satisfying to my soul.
The core build team consisted of Frank/team lead, Buck/onsite construction supervisor, Rob/heavy equipment operator/carpenter and me, the sole CAV member. I found out that the CAV’s don’t show up until after Thanksgiving and fill up the build schedules until mid to late March, then the CAV migration starts to move North once again. I should have deduced that looking at the number of builds and CAV sign-ups, but thought they would fill up at the last minute, which was wrong. Lesson learned.
This build was not what I was expecting to see when I got there. Instead of the traditional stick build method, instead, I was staring at the largest pile of rectangular building blocks I had ever seen. The side walls and main house beam were already up and I arrived just when the roof was being assembled. So, this is the beginning of my “SIP” build story.
“SIP” is an acronym, which translated into English means: “A structural insulated panel (or structural insulating panel), SIP, is a composite set of building materials. A panel consists of a thick insulating foam core sandwiched between two layers of structural board.” OK, think of engineered wood (OSB) with a dense foam core in the middle. So, the question is: what is OSB? OSB is Oriented strand board (OSB), also known as flake-board, is a type of engineered lumber like particle board, formed by adding adhesives and then compressing the layers of wood strands (flakes) in non-specific orientations.
So why use OSB instead of plywood would be a good question to ask. Plywood is very good, but it is almost always made into 4×8 sheets and if you were to require larger pieces, be prepared to a hefty price escalation. OSB, on the other hand, can be easily made to order for custom sizes. The panels that we were using were 8 feet wide and 14 feet long. They were “yuuuuge”! With about 8” or so of dense foam in between the OSB pieces. Think of an ice cream sandwich, now you have the idea.
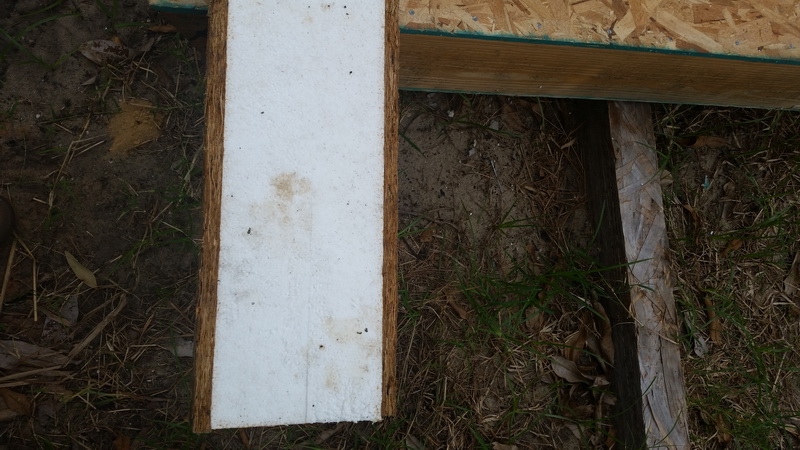

Note that the bottom edge has a 2”x10” that will be the fascia and the opposite side has another 2×10 (not shown). The alignment of the OSB sides and the 2×10 were peculiar to me because one side had a 2×10 and the other didn’t. The exposed edge of the 2×10 on opposite side was not even with the OSB, rather the OSB edge is nailed to the middle of the exposed 2×10, leaving the other ½ of the edge exposed. I had to watch the assembly to see how it fit together. The panel edge (shown) does not have a 2×10, and the foam is inset about 1” or so inside the edge.The panel cross section is ¾” OSB glued to 8” + of dense foam glued to another ¾” OSB. The photo below is a typical 8’x14′ SIP roof panel – Manufactured by SIPSTeamUSA.
Before the lift, the edges are glued with industrial strength caulking (liquid nails), so when lifted into place, the pieces slip together making a solid interconnected roof with 12” screws with large washers on 12”
Because of the smaller than usual property lot size, a custom size home was needed. It was designed and manufactured to fit this lot.spacing. These screws go completely through the panels into the massive beam.
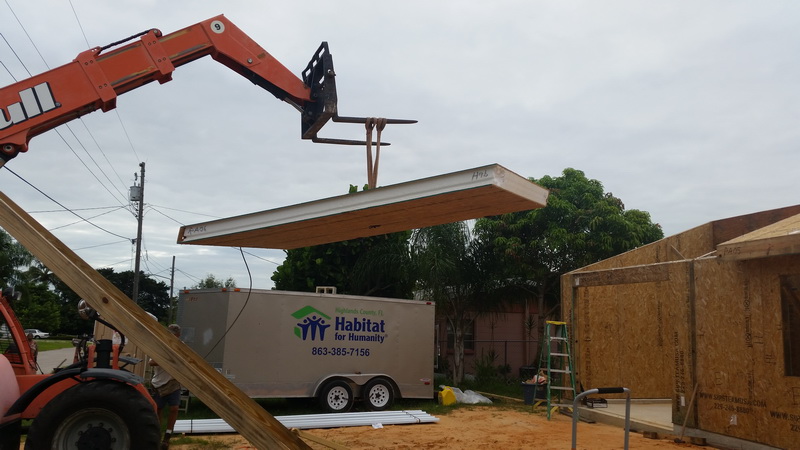
The house arrives at the build site on multiple flatbed semi-trailers, so having a lot of people and equipment ready to offload is imperative; a logistical problem for sure!
Interesting enough, the panels are not in any order on the trucks. Aha! It’s really a 3-dimensional jig-saw puzzle and the pieces are all over the place.
A large “LULL” (think of a forklift on steroids) is used to offload the panels from the semi’s and erect the building.
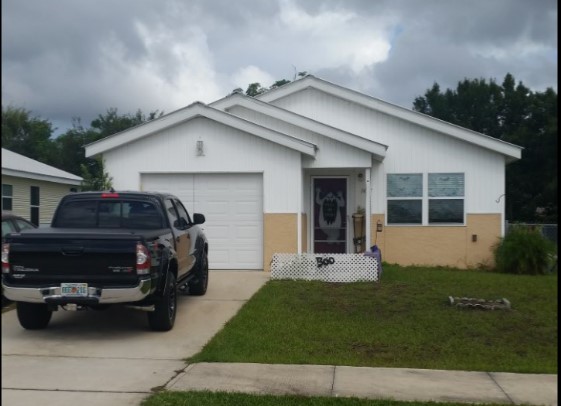
This 2BR, 2BA 950 sq. ft. (living space) home w/1 car garage was a custom design, built specifically for the size of this property. This is what it will look like when all the panels are assembled. If you were wondering about how the house design holds up in a hurricane, the specs say 140mph winds! That is the minimum local building requirement, and watching the assembly, I believe it would hold up.
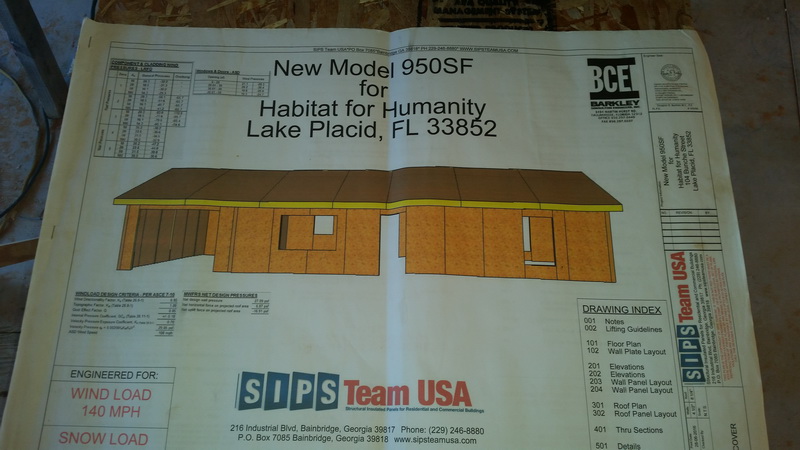
Figure 4 – This is what the house will look like when the rough assembly is completed
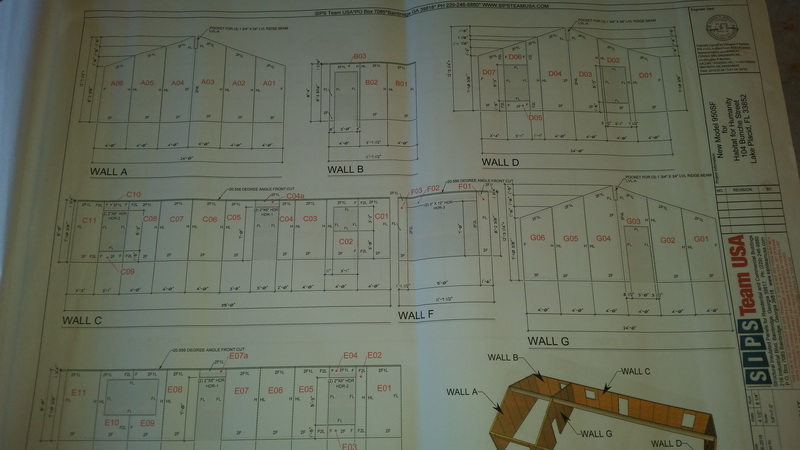
Once the sidewalls were erected, another semi arrived hauling an estimated 8” x 24” x 52ft long roof beam. Rob estimated it weighed about 8,000#. It was lifted and slipped into position in the sidewall slots and then some serious bolts were used to secure that thing in-place!During the slab pouring, there were long 5/8” carriage bolts placed in the concrete around the edge at specific points that the panels are placed upon with multiple washers and nuts. Once the slab has set up, 2×4”, OSB and another 2×4 are laid over the bolts making a lip to mount the panels on then bolted down. The wall panels are easily handled by 2 team members and are lifted and slipped over the 2×4 lip and are vertically mounted on to the slab. Then each panel is snugly fit together with an industrial adhesive (used liberally) to ensure a solid fit then sides are screwed together and nailed form the inside and outside of the installed 2×4 lip.
On the technical side, the roof panels have an R50 rating and the sidewalls are R38. That’s means incredible heating/cooling efficiency!
Here is a picture of the roofing screw on an 8 ½ x 11 and another sheet underneath to give some perspective. The Orange capped nail is used for the roof and siding tar paper.

| The roof panels are interlocked together with an industrial adhesive (used (liberally) same as the sidewalls to ensure a solid fit and then using a specially designed screw fastener (See: Figure 6) are screwed into the sidewalls. |

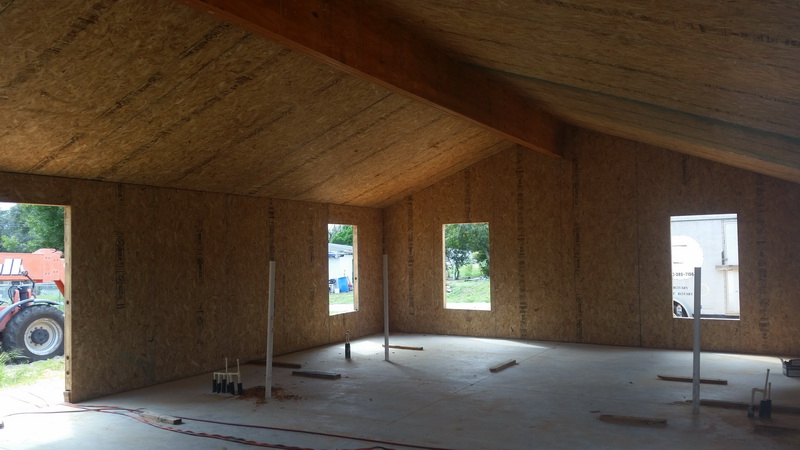
Figure 8 – An interior picture of the assembled house
When the panel assembly was completed, this is what it looks like on the inside of the house.
Now that all the panels are installed, we needed to get another inspection by the county before we started putting on the tar paper. The inspector came out checked everything over and approved the workmanship. That approval also gave us permission to get the electric pole connected. Up until then, it was all generator power, I’m sure the neighbors were happy to have the generator shut off.
If you look at the door opening on the right wall, you will see 3- 2 1/2” horizontal holes in the sidewalls. Those holes are called “wire chases”. The wire chases are used by the electricians for pulling all the electric wires through the walls. I thought that was clever! One of my assigned tasks was to make sure that all the wire chases were clear of nail obstructions. So, I needed to mark chalk lines where the top and the bottom of edge of each wire chase. I had to inspect the inside and outside to make sure that one of the things I noted was the walls were already prepped for the electrical runs.

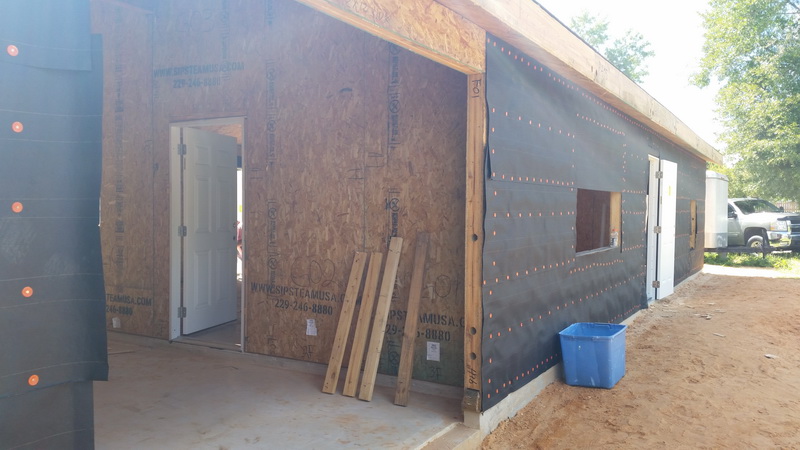
Our next job was installing the roof and sidewall tar paper. The professional carpenters always refer this as the “black-in” day. To me in a couple of words, it was just a nasty job. Nasty.no one drove any nails into that space which could have prevented the wiring to go through. Having a blocked wire chase doesn’t make the electricians very happy at all.
One of the things I was immediately told when installing the tar paper was that the inspectors are very particular about the spacing gap of the orange plastic nail caps on the tar paper depending on which line was being nailed.
The spacing depends on the wind rating (140mph in this case), So, in this case, it was 4”. Over a short time, I got to love the #12, 1” long Grip-Rite plastic round cap roofing nails. Lucky for me, I was trained by a team member “Buck” that was a professional roofer by trade and owned his own roofing company. He gave me a lot of “tips and tricks” on how to do things and do them safely, especially on the roof.
We put our harnesses on and up to the roof we went. Buck made sure that my rope slack wouldn’t let me near the edge of the roof, he took care of the areas I couldn’t reach!
Line after line, the hammering continued in the blazing hot sun with the nasty tar paper.
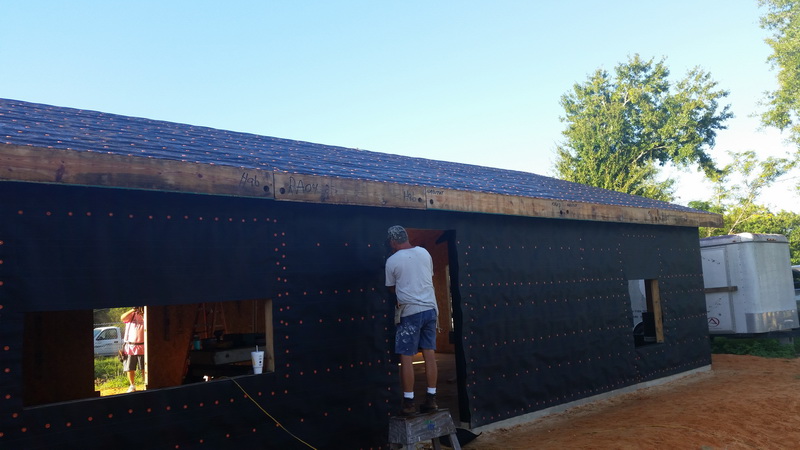
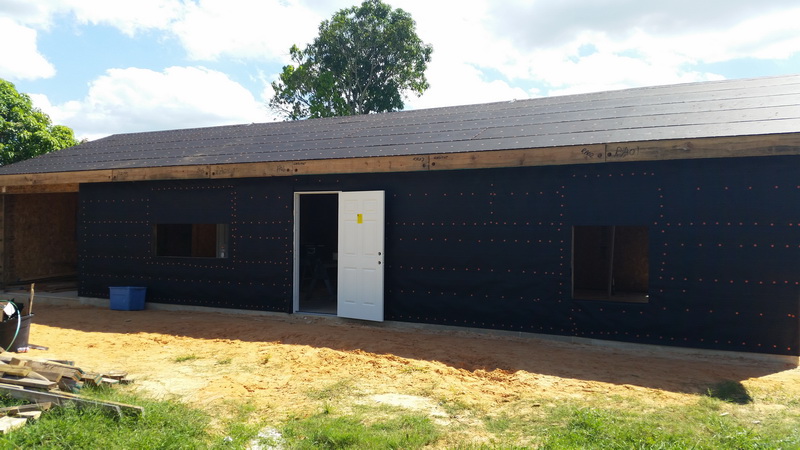
The roof was completed earlier in the afternoon after a 2-day hammer-thon. The siding crew was scheduled for the following weekend.At the end of the day, two of us were walking around looking for anything that wasn’t just perfect.
When my 2 weeks were up, I left with a feeling of accomplishment working with a great team and knowing I have helped someone that I’ve never met. It was a sad goodbye to them and I was asked repeatedly to stay for another 2 weeks. Frank, Buck, and Rob said that I would be welcomed back to their build team anytime, even if it was already full, they would make a spot for me.
Buck told me earlier of an HFH development in Sebring, so Pen and I drove over to see what the final house might look like when completed.
All of the houses we saw had metal roofs which are also what this house will have installed as well. Here are two of them.

This truly is simple, decent and affordable housing.
Absolutely.
So, will I do it again?
Yes!
We are looking at the 2017 RV and HFH builds listing.
They are great people to work with, they really are.
Special thanks to:
Habitat for Humanity of Highlands County, Florida
Blair Pakowski – Volunteer Manager
Frank, Buck and Rob – the build team
Chris the ReStore Manager